Every great vector illustration starts with a single shape. But that one shape quickly becomes ten, then fifty, then hundreds. If you have ever opened a file from a few months ago and felt confused by your own layers, you know the struggle. The difference between a messy file and a clean, editable masterpiece is how you organize your work. Vector layering techniques are not just about keeping things tidy. They are the secret to building complex artwork without losing your mind. Whether you are designing a detailed character, a cityscape, or a brand illustration, the way you stack and name your layers directly impacts your speed and your final result.
Mastering vector layering techniques means you can edit any part of your illustration without breaking the rest. This guide walks you through a repeatable step by step process: starting with a rough sketch, separating foreground and background, grouping related elements, using clipping masks, and applying color with global swatches. You will also learn common mistakes to avoid and how to keep your file size manageable.
Why Layers Are the Backbone of Vector Art
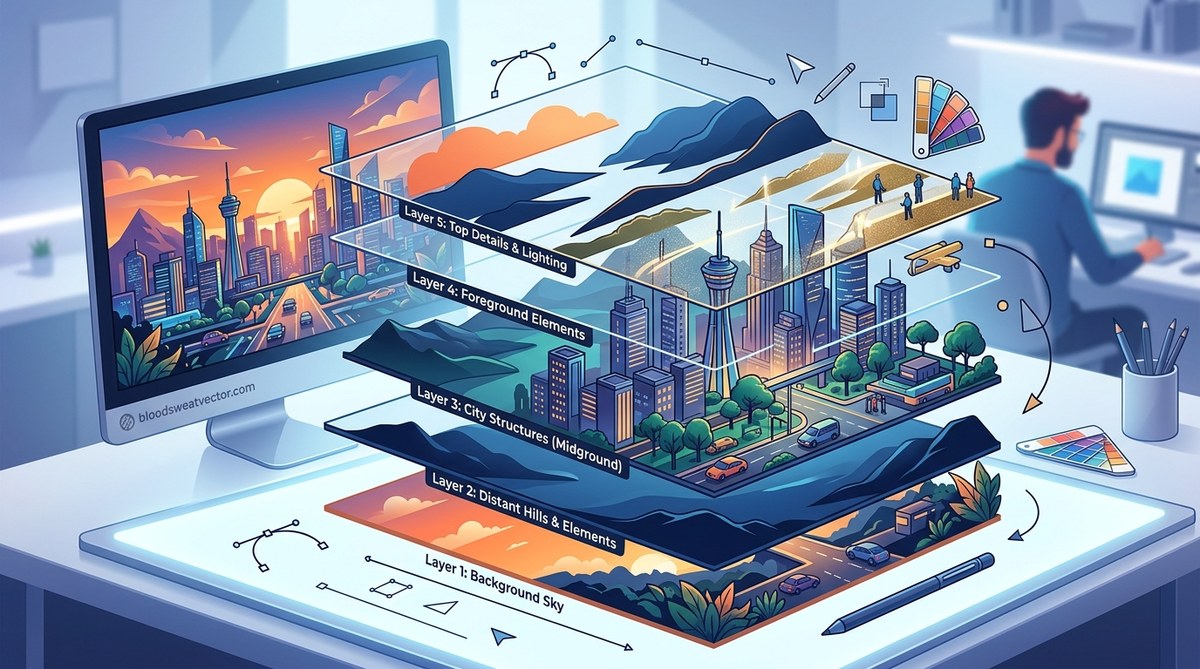
Think of layers like the floors in a building. The ground floor holds your background. The second floor holds your midground elements. The top floor holds your foreground details. If you need to change the wallpaper on the ground floor, you do not want to knock down the entire building. Layers give you that control.
In Adobe Illustrator or Affinity Designer, each layer can contain multiple objects, groups, and sublayers. When you use vector layering techniques properly, you can lock, hide, or isolate specific parts of your artwork. This becomes critical when your illustration has hundreds of individual paths.
A common mistake beginners make is drawing everything on one layer. That approach works for a simple icon, but it falls apart fast. Imagine trying to select a single leaf on a tree when every leaf, branch, and shadow is on the same layer. You would spend more time untangling selections than actually designing.
The Step by Step Process for Building Complex Illustrations
Here is a repeatable workflow you can apply to any project. These vector layering techniques work in both Adobe Illustrator and Affinity Designer.
-
Start with a sketch layer. Create a dedicated layer for your rough sketch or reference image. Set it to a low opacity (around 20 to 30 percent) and lock it. This layer is your map. You will trace over it without ever accidentally moving it.
-
Build your background layer. Below everything else, create a layer for the background. This includes sky, ground, walls, or any environment elements. Keep these shapes simple and use solid fills or gradients. Do not add detail yet.
-
Separate foreground and midground. Create two distinct layers: one for midground and one for foreground. Midground holds the main subjects. Foreground holds elements closest to the viewer, like grass, frames, or overlapping objects. This separation gives your illustration depth.
-
Group related elements within layers. Inside each layer, use groups to keep related objects together. For example, a character might have a group for the head, a group for the torso, and a group for the arms. Name each group something clear like “head” or “left arm.”
-
Use clipping masks for complex shapes. When you need to contain a texture or pattern inside a shape, use a clipping mask. Keep the mask on its own sublayer so you can edit the shape later without breaking the mask.
-
Apply color with global swatches. Instead of picking random colors, create swatches in your Swatches panel. Use global colors so that when you change a swatch, every object using that color updates automatically. This is a lifesaver when a client asks for a different shade of blue.
-
Lock and hide as you go. As you finish a section, lock that layer or group. This prevents accidental edits. Hide layers that distract you while you focus on a specific area.
Common Layering Mistakes and How to Fix Them
Even experienced designers fall into these traps. Here is a table that outlines the most common mistakes and the simple fixes.
| Mistake | Why It Hurts | The Fix |
|---|---|---|
| Using generic layer names like “Layer 1” | You waste time hunting for elements | Rename every layer immediately. Use names like “Background Sky” or “Character Hair” |
| Merging everything into one layer | You lose the ability to edit individual parts | Keep separate layers for background, midground, and foreground |
| Forgetting to lock reference layers | You accidentally move your sketch while tracing | Lock the sketch layer as soon as you place it |
| Overloading a single layer with 100 objects | The Layers panel becomes impossible to scroll through | Use sublayers and groups to break things into chunks of 10 to 15 objects |
| Ignoring the stacking order | Objects hide behind others unexpectedly | Check the layer order regularly. Background goes at the bottom, foreground at the top |
| Not using global swatches | Changing a color means editing every single object | Convert all fills to global swatches before you start adding detail |
Organizing Your Layers Like a Pro
Good organization is a habit. Here are the practices that professional vector artists use every day.
-
Use a naming convention. Stick to a system. For example, start with a category like “BG” for background, “MG” for midground, and “FG” for foreground. Then add a descriptor. “BG_Sky_Gradient” tells you exactly what that layer holds.
-
Color code your layers. Both Illustrator and Affinity Designer let you assign colors to layers. Use red for background, blue for midground, and green for foreground. This visual cue helps you navigate instantly.
-
Create master folders. In complex illustrations, group related layers into a master folder. For example, a “Cityscape” folder might contain subfolders for “Buildings,” “Streets,” and “Sky.”
-
Delete empty layers. As you work, you might create layers you never use. Clean them out. A cluttered Layers panel slows down your workflow.
-
Save versions. Before making major changes, duplicate the entire file. Name it with a version number. This gives you a safety net if something goes wrong.
Expert Advice: “The best vector layering technique I ever learned was to treat each layer like a transparent sheet of acetate. Each sheet holds one piece of the puzzle. When you stack them together, you see the full picture. If you need to change one piece, you only touch that one sheet.” – Senior Illustrator at a top design studio
When to Use Sublayers and Groups
Sublayers and groups serve different purposes. Knowing the difference saves you time.
-
Groups are best for objects that move together. If you rotate a group, everything inside rotates as a unit. Use groups for things like a hand (palm and fingers) or a car (body and wheels).
-
Sublayers are best for objects that need independent editing but belong to the same category. For example, a “Character” layer might have sublayers for “Head,” “Torso,” “Arms,” and “Legs.” Each sublayer can have its own groups inside.
A good rule of thumb: use groups for functional units and sublayers for structural separation.
How Vector Layering Techniques Affect File Size
File size matters, especially if you share files with clients or team members. Layers themselves do not add much weight. The problem comes from hidden data. If you have hundreds of hidden objects scattered across layers, your file gets bloated.
To keep file sizes manageable:
- Delete hidden objects you no longer need.
- Use symbols or components for repeated elements. If you have ten identical windows, turn one into a symbol and place instances.
- Avoid embedding raster images inside vector files. Link them instead.
- Trim excess anchor points. Too many points slow down rendering.
These habits pair well with learning mastering vector art techniques for stunning digital creations. Clean layers plus clean paths equal a professional result.
Adapting These Techniques for Different Software
The core principles stay the same whether you use Adobe Illustrator or Affinity Designer. The interface differs slightly, but the logic is identical.
In Adobe Illustrator, the Layers panel lives on the right side. You can create new layers by clicking the page icon. Double click a layer to rename it and assign a color. Use the “Collect in New Layer” command to move selected objects into a new layer.
In Affinity Designer, the Layers panel is on the right as well. Click the “Add Layer” button at the bottom. You can drag and drop objects between layers. Affinity also supports layer parenting, which lets you nest layers inside each other.
If you want to see how these techniques apply to specific design projects, check out how to create eye-catching logos using vector art techniques. The same layering principles work for logos, icons, and full illustrations.
A Real World Example: Building a Forest Scene
Let us walk through a practical example. You want to create a forest illustration with trees, animals, and a sunset sky.
Start with a locked sketch layer. Draw the rough composition.
Create a “Background” layer. Add a gradient for the sky and a solid shape for the ground. Lock this layer.
Create a “Midground Trees” layer. Draw the tree trunks and leaves. Group each tree individually. Name the groups “Tree Left” and “Tree Right.”
Create a “Foreground” layer. Add bushes, grass blades, and a fence. These elements overlap the trees and add depth.
Create a “Characters” layer. Draw a deer and a rabbit. Use sublayers for each animal. Inside the deer sublayer, create groups for the body, legs, and antlers.
Finally, create a “Lighting” layer. Add soft highlights and shadows using transparent shapes. Set the blend mode to Multiply for shadows and Screen for highlights.
This structure lets you edit any part of the scene without affecting the rest. If the client wants a different sky color, you only touch the Background layer. If the deer needs to move, you only touch the Characters layer.
Taking Your Skills Further
Once you feel comfortable with basic layering, you can start experimenting with more advanced methods. For example, you can use layer effects like drop shadows or glows on separate layers to keep your base shapes clean. You can also use opacity masks to create smooth transitions between elements.
If you want to stay current with what is working in the industry, look at the top trends in vector artwork that every designer should know. Many of the top trends rely heavily on smart layer management.
Another area where layering shines is in how to convert hand drawn art into vector graphics. When you scan a hand drawn sketch, placing it on its own locked layer makes the tracing process smooth and frustration free.
Your Next Step with Vector Layering
The best time to start using these vector layering techniques is on your very next project. Open a new file. Create a sketch layer. Name it. Lock it. Then build your background, midground, and foreground layers before you draw a single shape. This small investment at the start will save you hours of cleanup later.
Remember, layers are not just a technical requirement. They are a creative tool. When you organize your artwork well, you free up mental energy to focus on the fun parts: color, composition, and storytelling. So go ahead, open that file, and start stacking your layers with confidence.